In this guide, we will set up a mirror for the JobRunr Pro private artifacts repository in order to cache the Maven artifacts to increase resiliency. There are several tools that allow you to easily mirror an artifacts repository. In this guide we will cover JFrog Artifactory, Reposilite, and Sonatype Nexus Repository, choose the solution that best fits with your company’s needs. Or perhaps you already have one of them up and running: in that case read on to find out how to include the JobRunr Pro private repository.
Let us know if you’re using a tool not covered in this guide and would like help in mirroring our private releases repository with your tool.
⚠️ Please make sure your proxy is only available by your company, i.e., it should not be accessible publicly by anonymous users!
Disclaimer: Our main focus is showing how to setup a proxy of the JobRunr Pro private releases. For the purposes of this guide, we will show how to start an artifact server. However, It is the end-user’s task to make sure the configuration follows their internal security policy and the best practices from the respective server type.
JFrog
Starting a local JFrog Artifactory server
To start a local JFrog Artifactory server, we’ll be using the official Docker image. See the official documentation pages for more details on how to set it up. Here’s the gist:
- Create a directory where JFrog Artifactory data will be saved
mkdir ~/jfrog
- Set the JFROG_HOME global variable to this directory
export JFROG_HOME=~/jfrog
- Create a
system.yamlfile inside$JFROG_HOME/artifactory/var/etc/
mkdir -p $JFROG_HOME/artifactory/var/etc/ && touch $JFROG_HOME/artifactory/var/etc/system.yaml && sudo chown -R 1030:1030 $JFROG_HOME/artifactory/var
macOS only
sudo chmod -R 777 $JFROG_HOME/artifactory/var
- Start a progress container
docker run --name postgres -itd -e POSTGRES_USER=artifactory -e POSTGRES_PASSWORD=password -e POSTGRES_DB=artifactorydb -p 5432:5432 library/postgres:latest
- Populate
system.yamlwith the db configuration
shared:
  database:
    driver: org.postgresql.Driver
    type: postgresql
    url: jdbc:postgresql://host.docker.internal:5432/artifactorydb
    username: artifactory
    password: password
- Start the Artifactory container using the following process:
docker run --name artifactory -v $JFROG_HOME/artifactory/var/:/var/opt/jfrog/artifactory -d -p 8081:8081 -p 8082:8082 releases-docker.jfrog.io/jfrog/artifactory-oss:latest
And we’re done. The application may need a few minutes to start. To make sure it has started run:
docker logs -f artifactory
Setup the JobRunr Pro private releases proxy
Let’s head over to http://localhost:8082. Since we did a fresh restart we need to complete a few mandatory initial configuration.
Note that the default username is
adminand the default password ispassword.
Then we can execute the following steps to setup the proxy.
- Configure the proxy
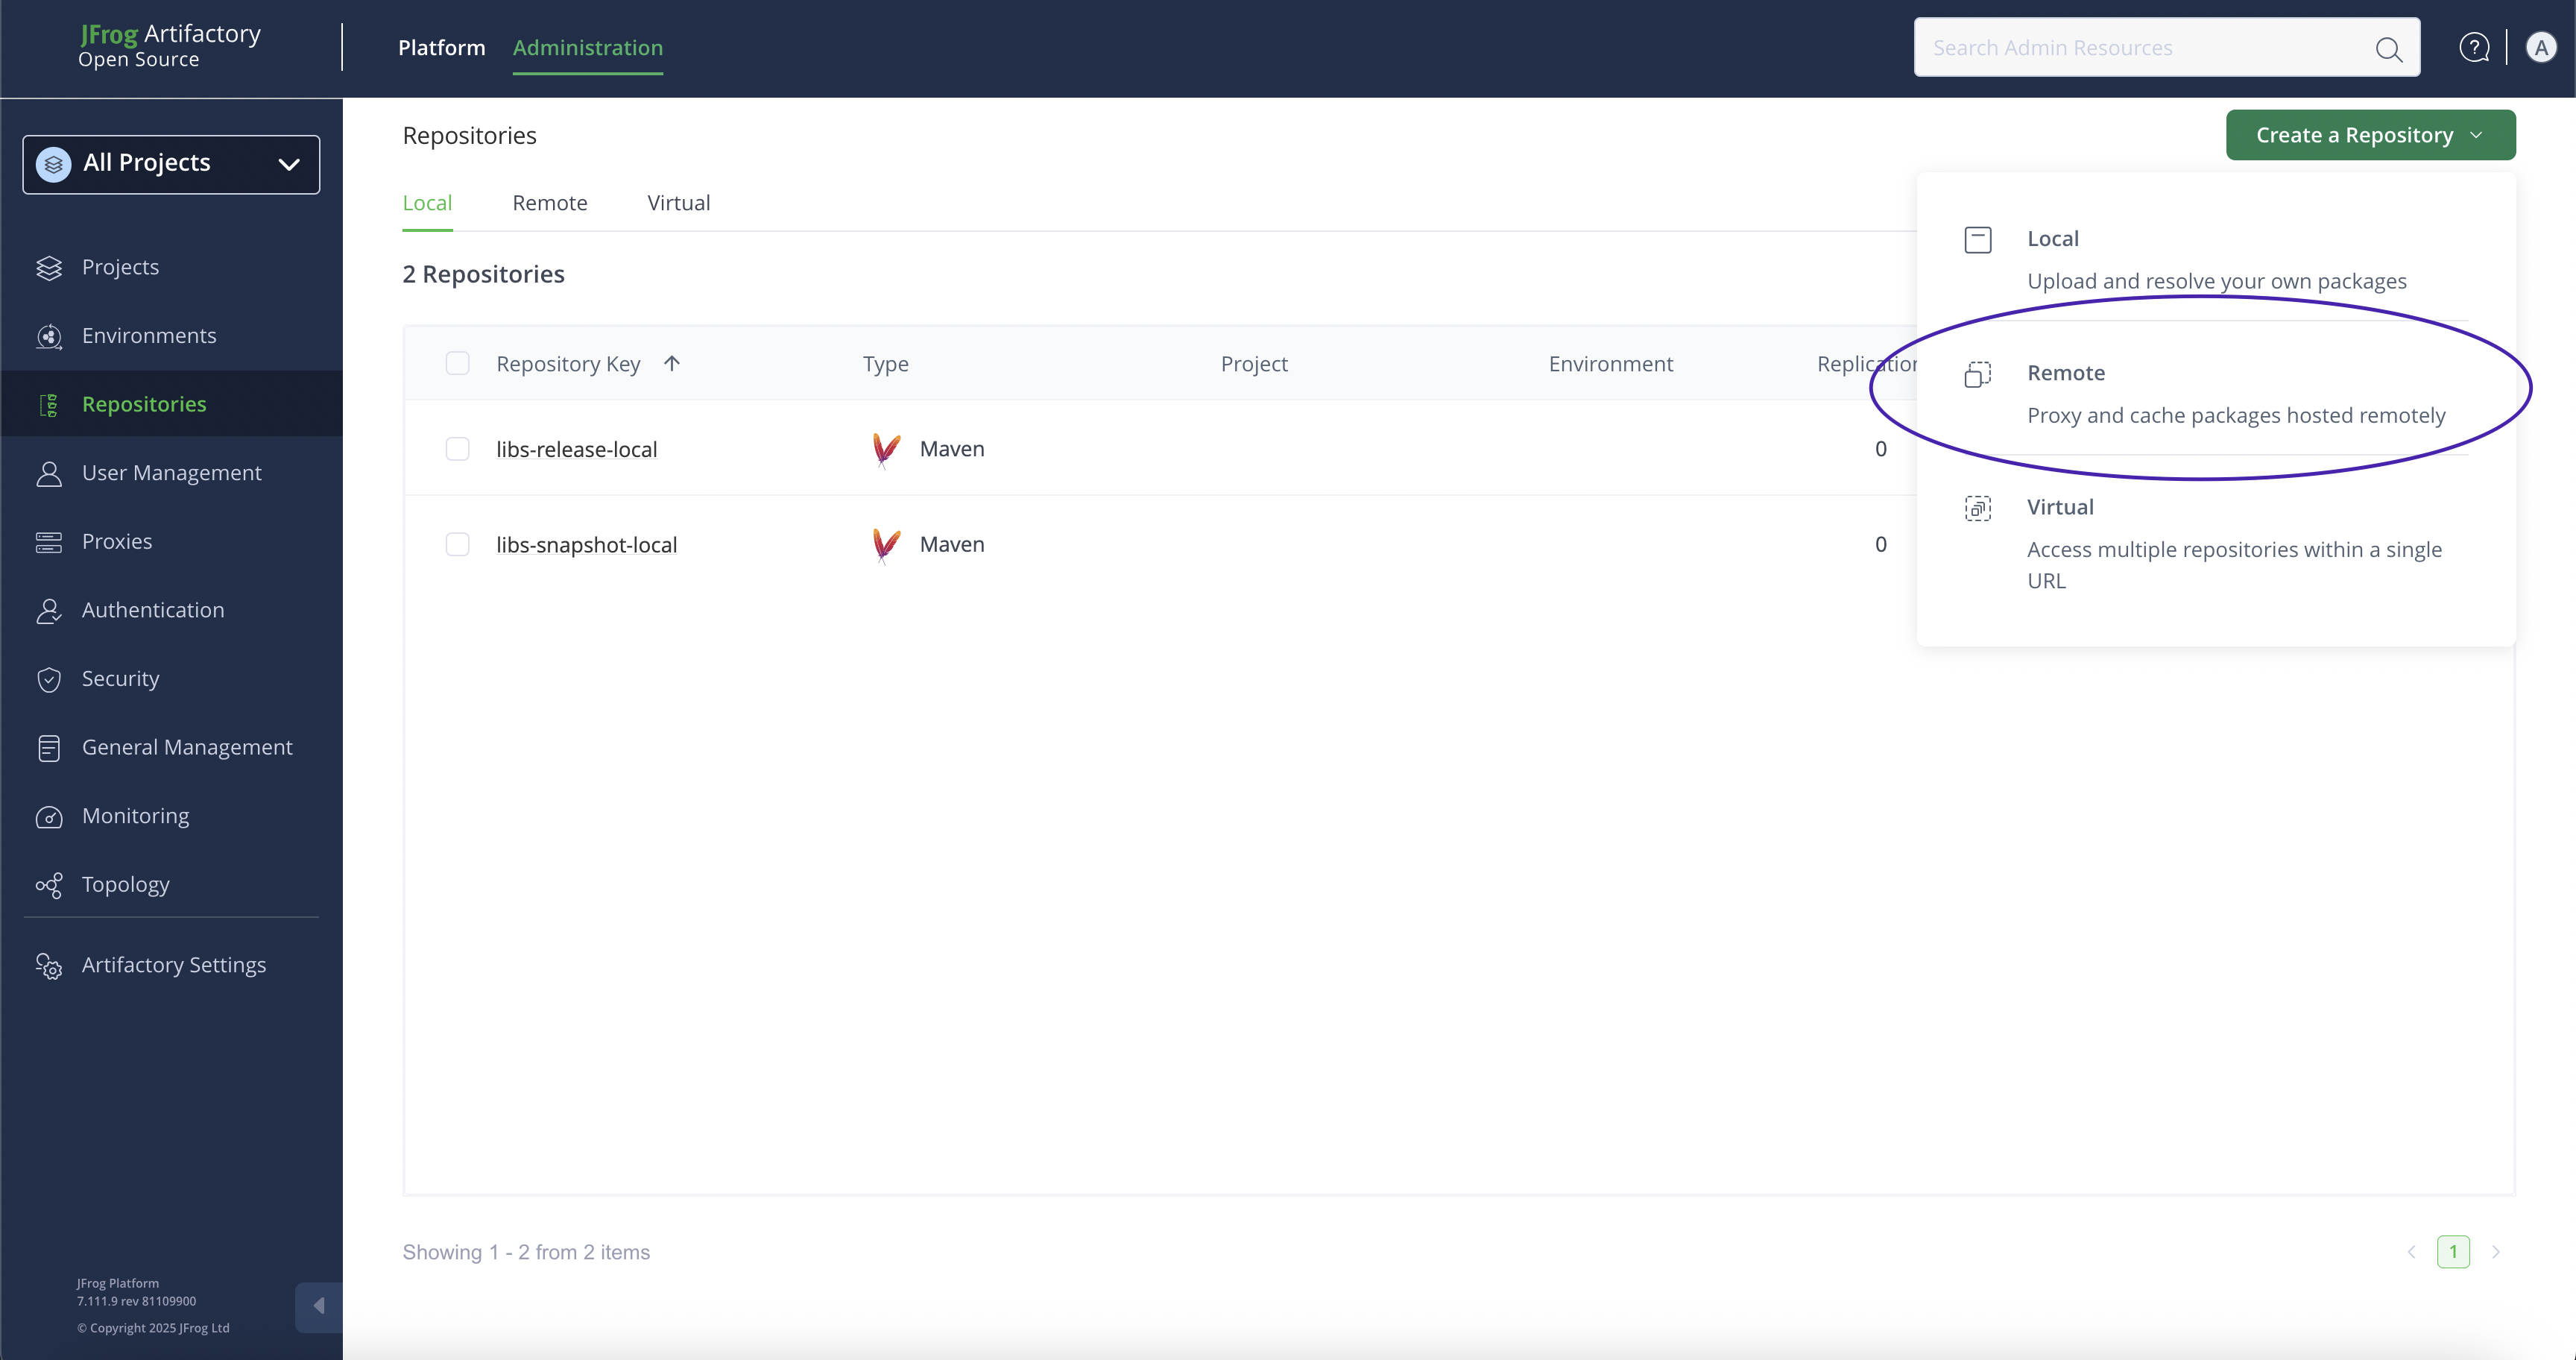
Click on the Administration tab, then in the sidebar, click on Repositories in sidebar. On the page you’ll find a button Create a Repository that opens a dropdown, choose to create a Remote repository. The image below shows the steps.
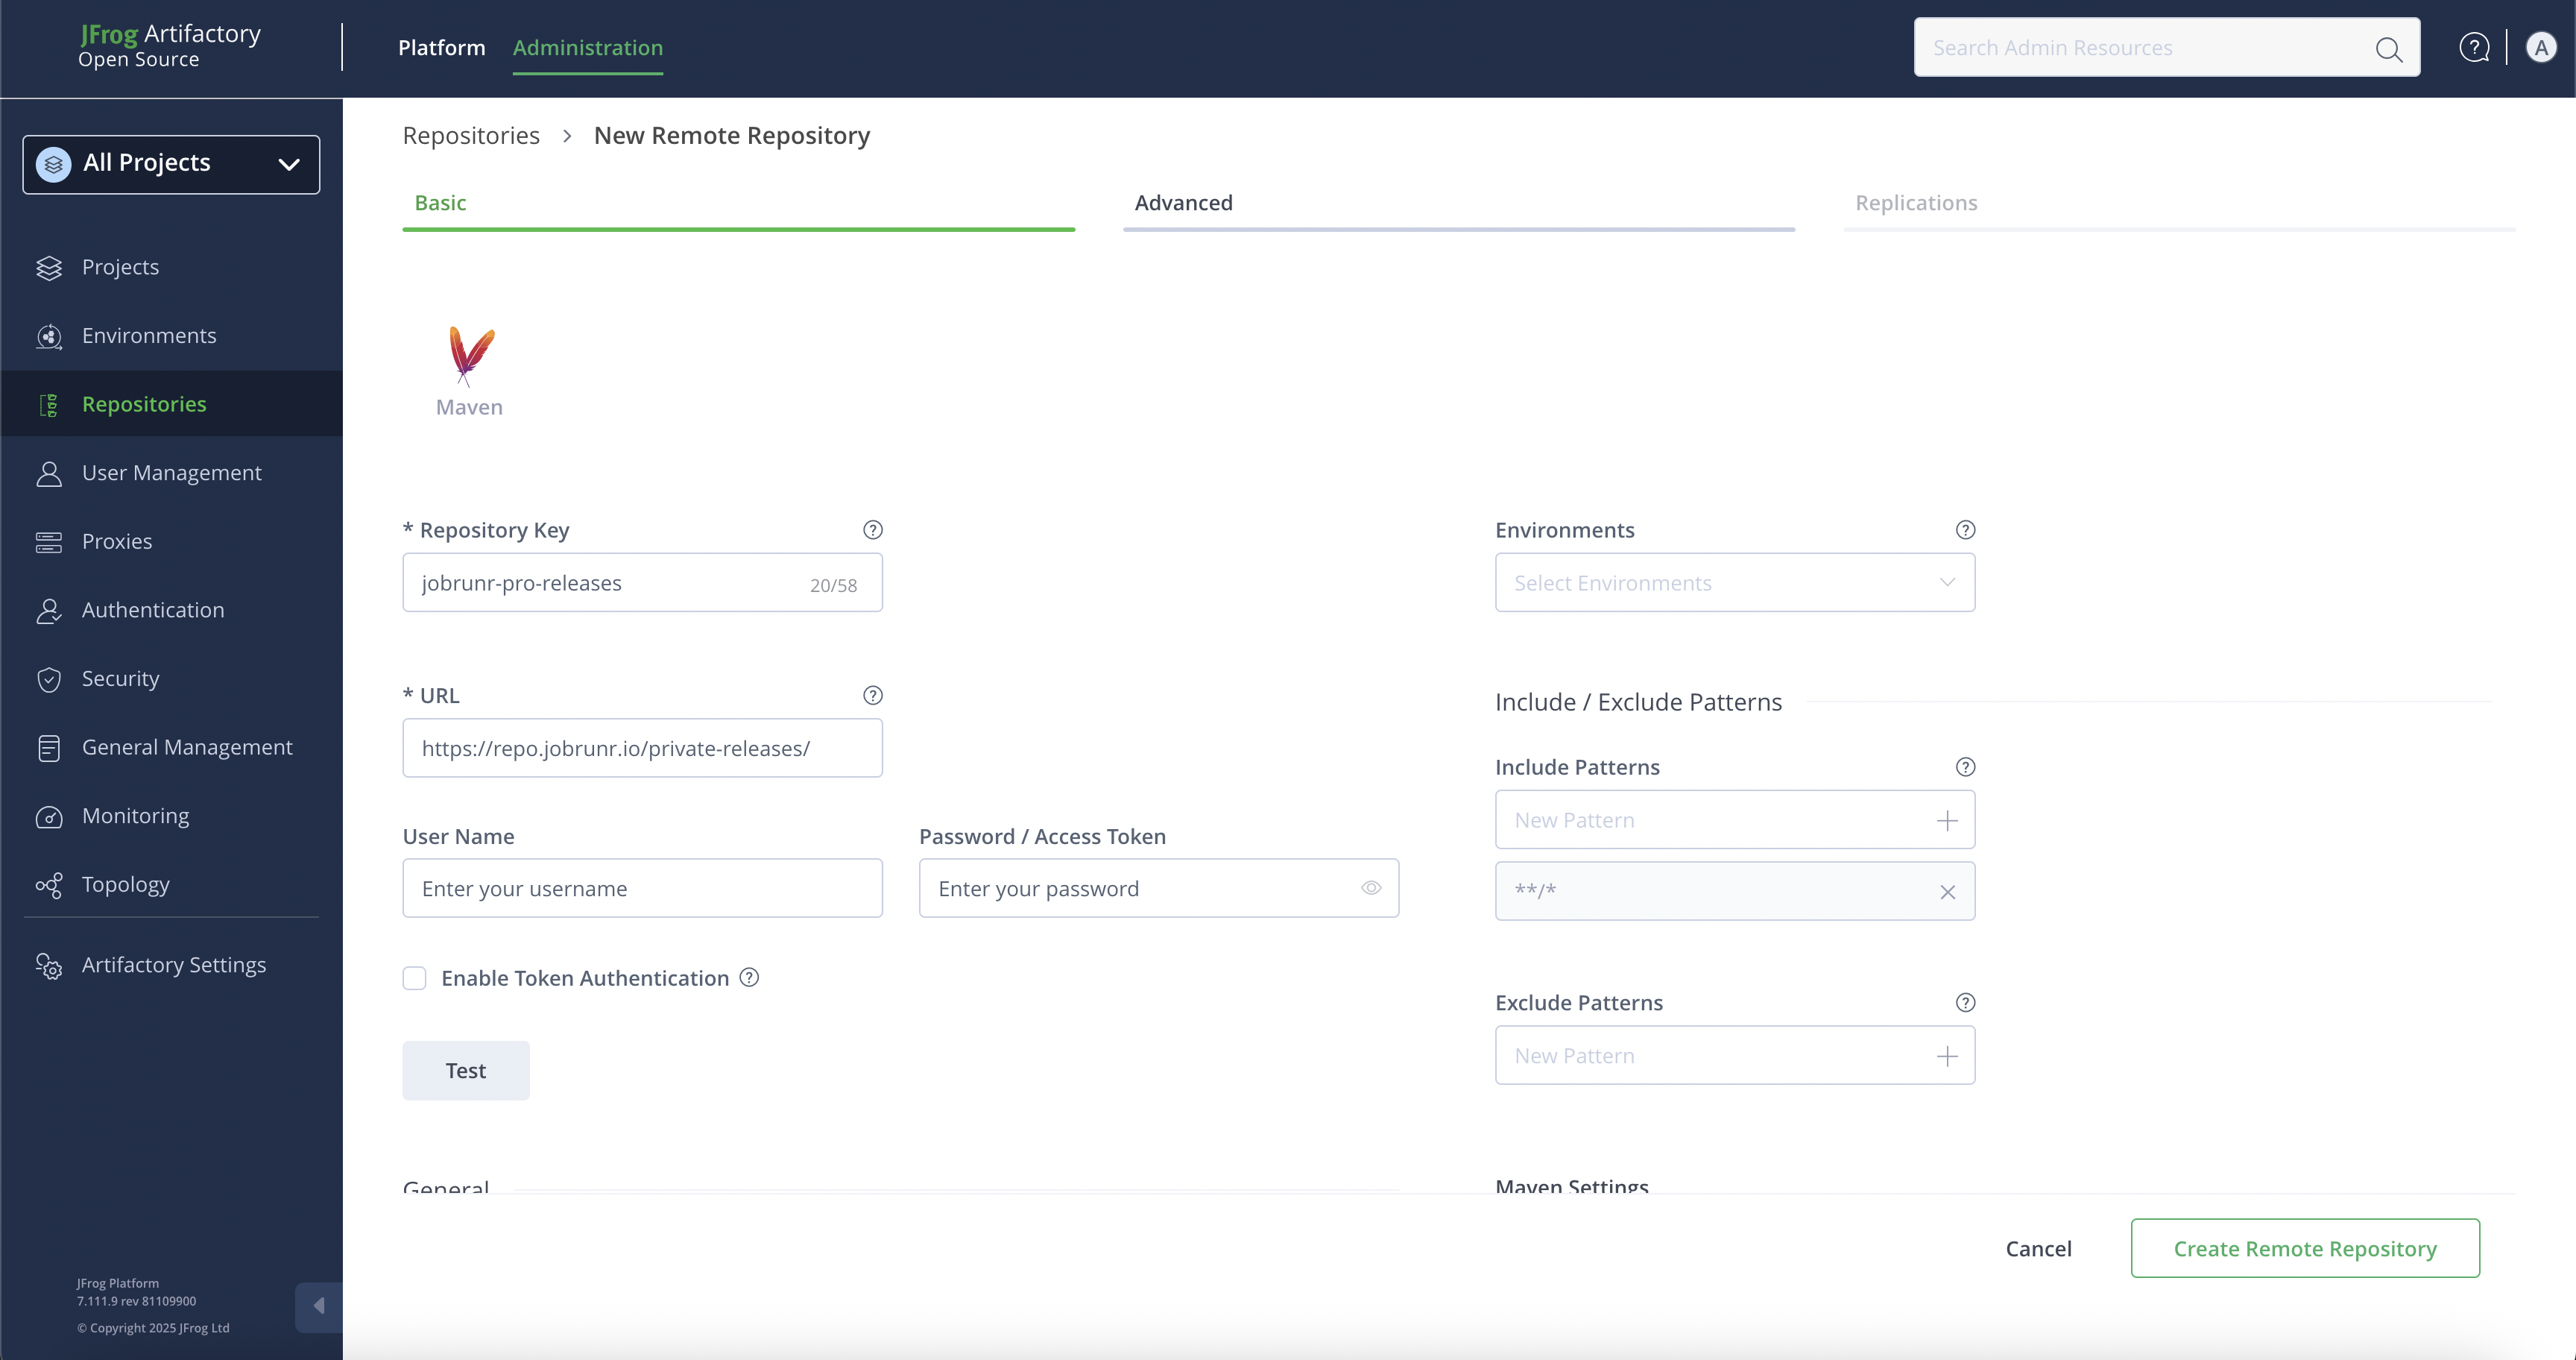
In the popup, select Maven as repository type. Then fill the form that follows; in addition to the mandatory fields, you need to provide the JobRunr Pro private releases URL, i.e., https://repo.jobrunr.io/private-releases/ and fill the username and password fields with the credentials we’ve shared with you.
That’s it! By following these steps, you have successfully configured the minimum required configuration for JFrog to proxy the private releases.
Note: Clicking on the
Testbutton will show an error but the configuration actually works.
Update your build tool configuration
You can find the summary of the information needed for your build tool to connect to the proxy, i.e., the name of the repository and its url by going back to Platform section and clicking on Artifacts under the Artifactory tab in the sidebar.
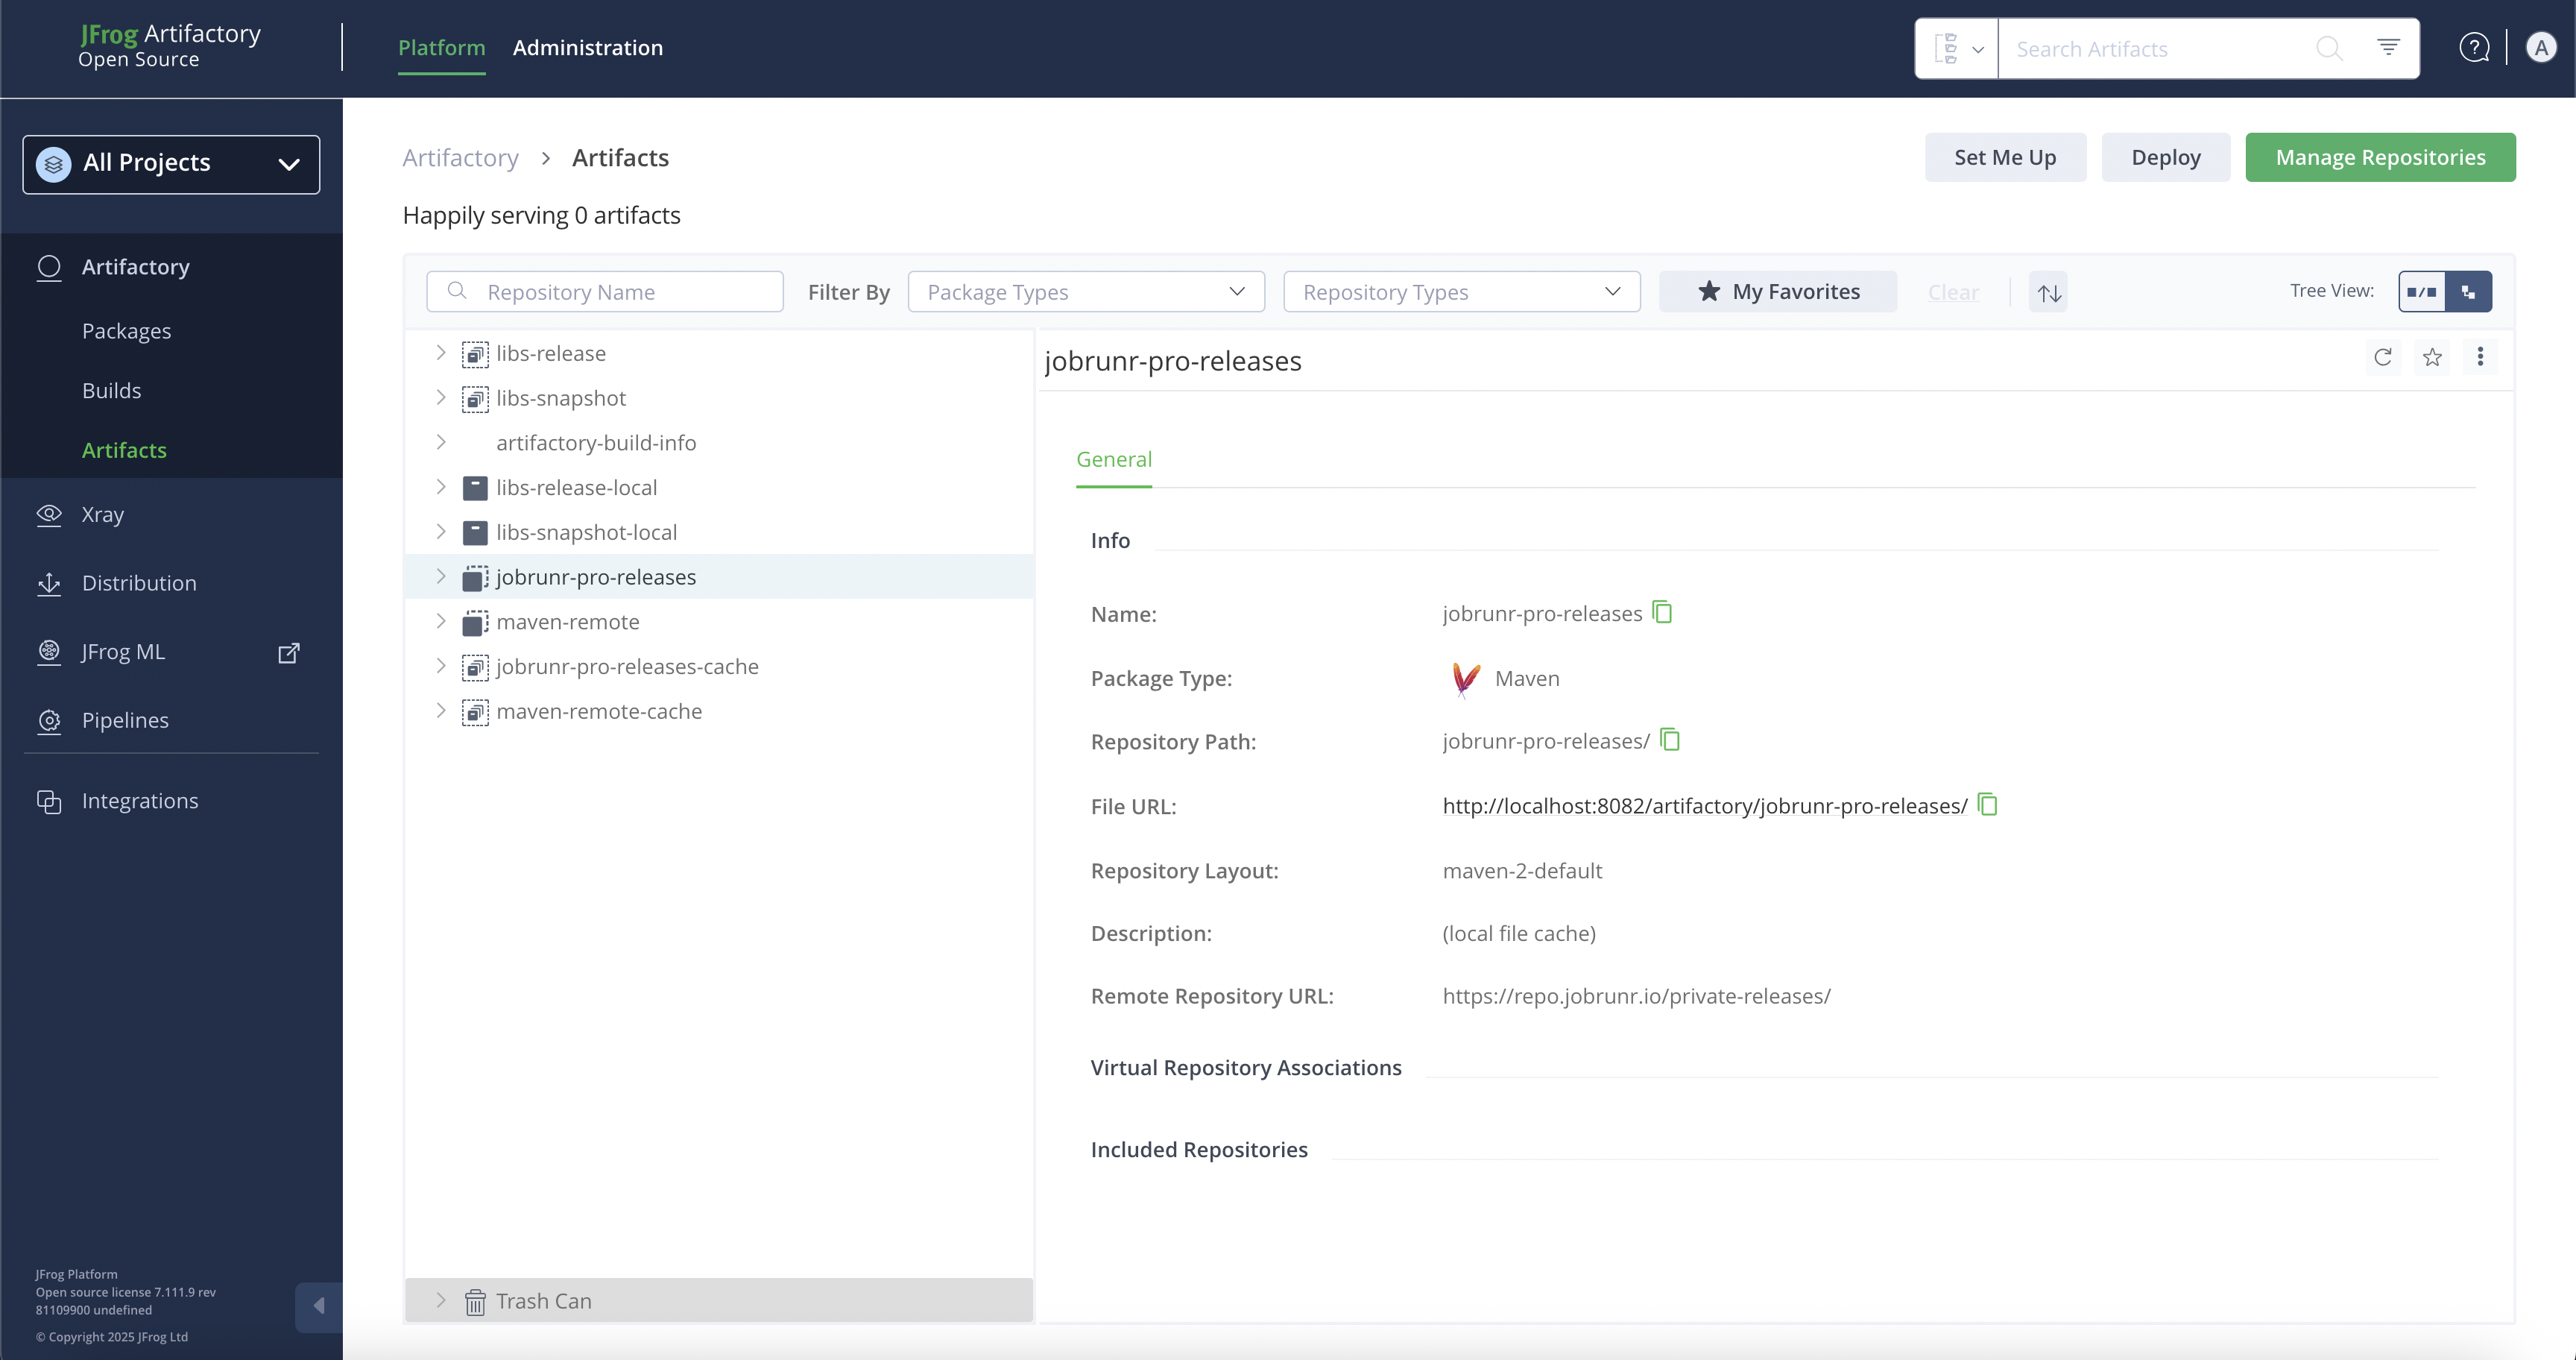
Using this information, you can proceed and configure your build tool as you’d usually do.
In our tests, we use the credentials of the admin, please make sure the user you usually use has access to this newly added repository proxy.
Reposilite
Starting a local Reposilite server
To start a local Reposilite server, we’ll be using the official Docker image and Docker Compose for extra configuration. For more information, see the official documentation that provides detailed steps on how to set it up. Let’s use the following compose.yaml as a starting point:
services:
  reposilite:
    image: dzikoysk/reposilite:3.5.26
    ports:
      - "8085:8080"
    environment:
      REPOSILITE_OPTS: '--token admin:reallyH@RDs3cr3t'
    volumes:
      - ./reposilite-data:/app/data
    restart: unless-stopped
    stdin_open: true
    tty: true
volumes:
  reposilite-data: {}
Run docker compose up to start the container. This should expose the reposilite dashboard on port 8085.
⚠️ As highlighted in the Reposilite documentation, do not forget to update the password!
Setup the JobRunr Pro private releases proxy
Once the Docker container is up and running, let’s head over to http://localhost:8085 to explore the Reposilite dashboard.
We log in using the default credentials as provided above. Note that the default username is admin and the default password is reallyH@RDs3cr3t.
Then we can execute the following steps to setup the proxy.
First, we need to configure the proxy. Click on the Settings tab, then, click on Maven. On the page you’ll find a button Private to add a new mirrored repositories.
Note you can also add a new repository configuration by clicking on the
+button.
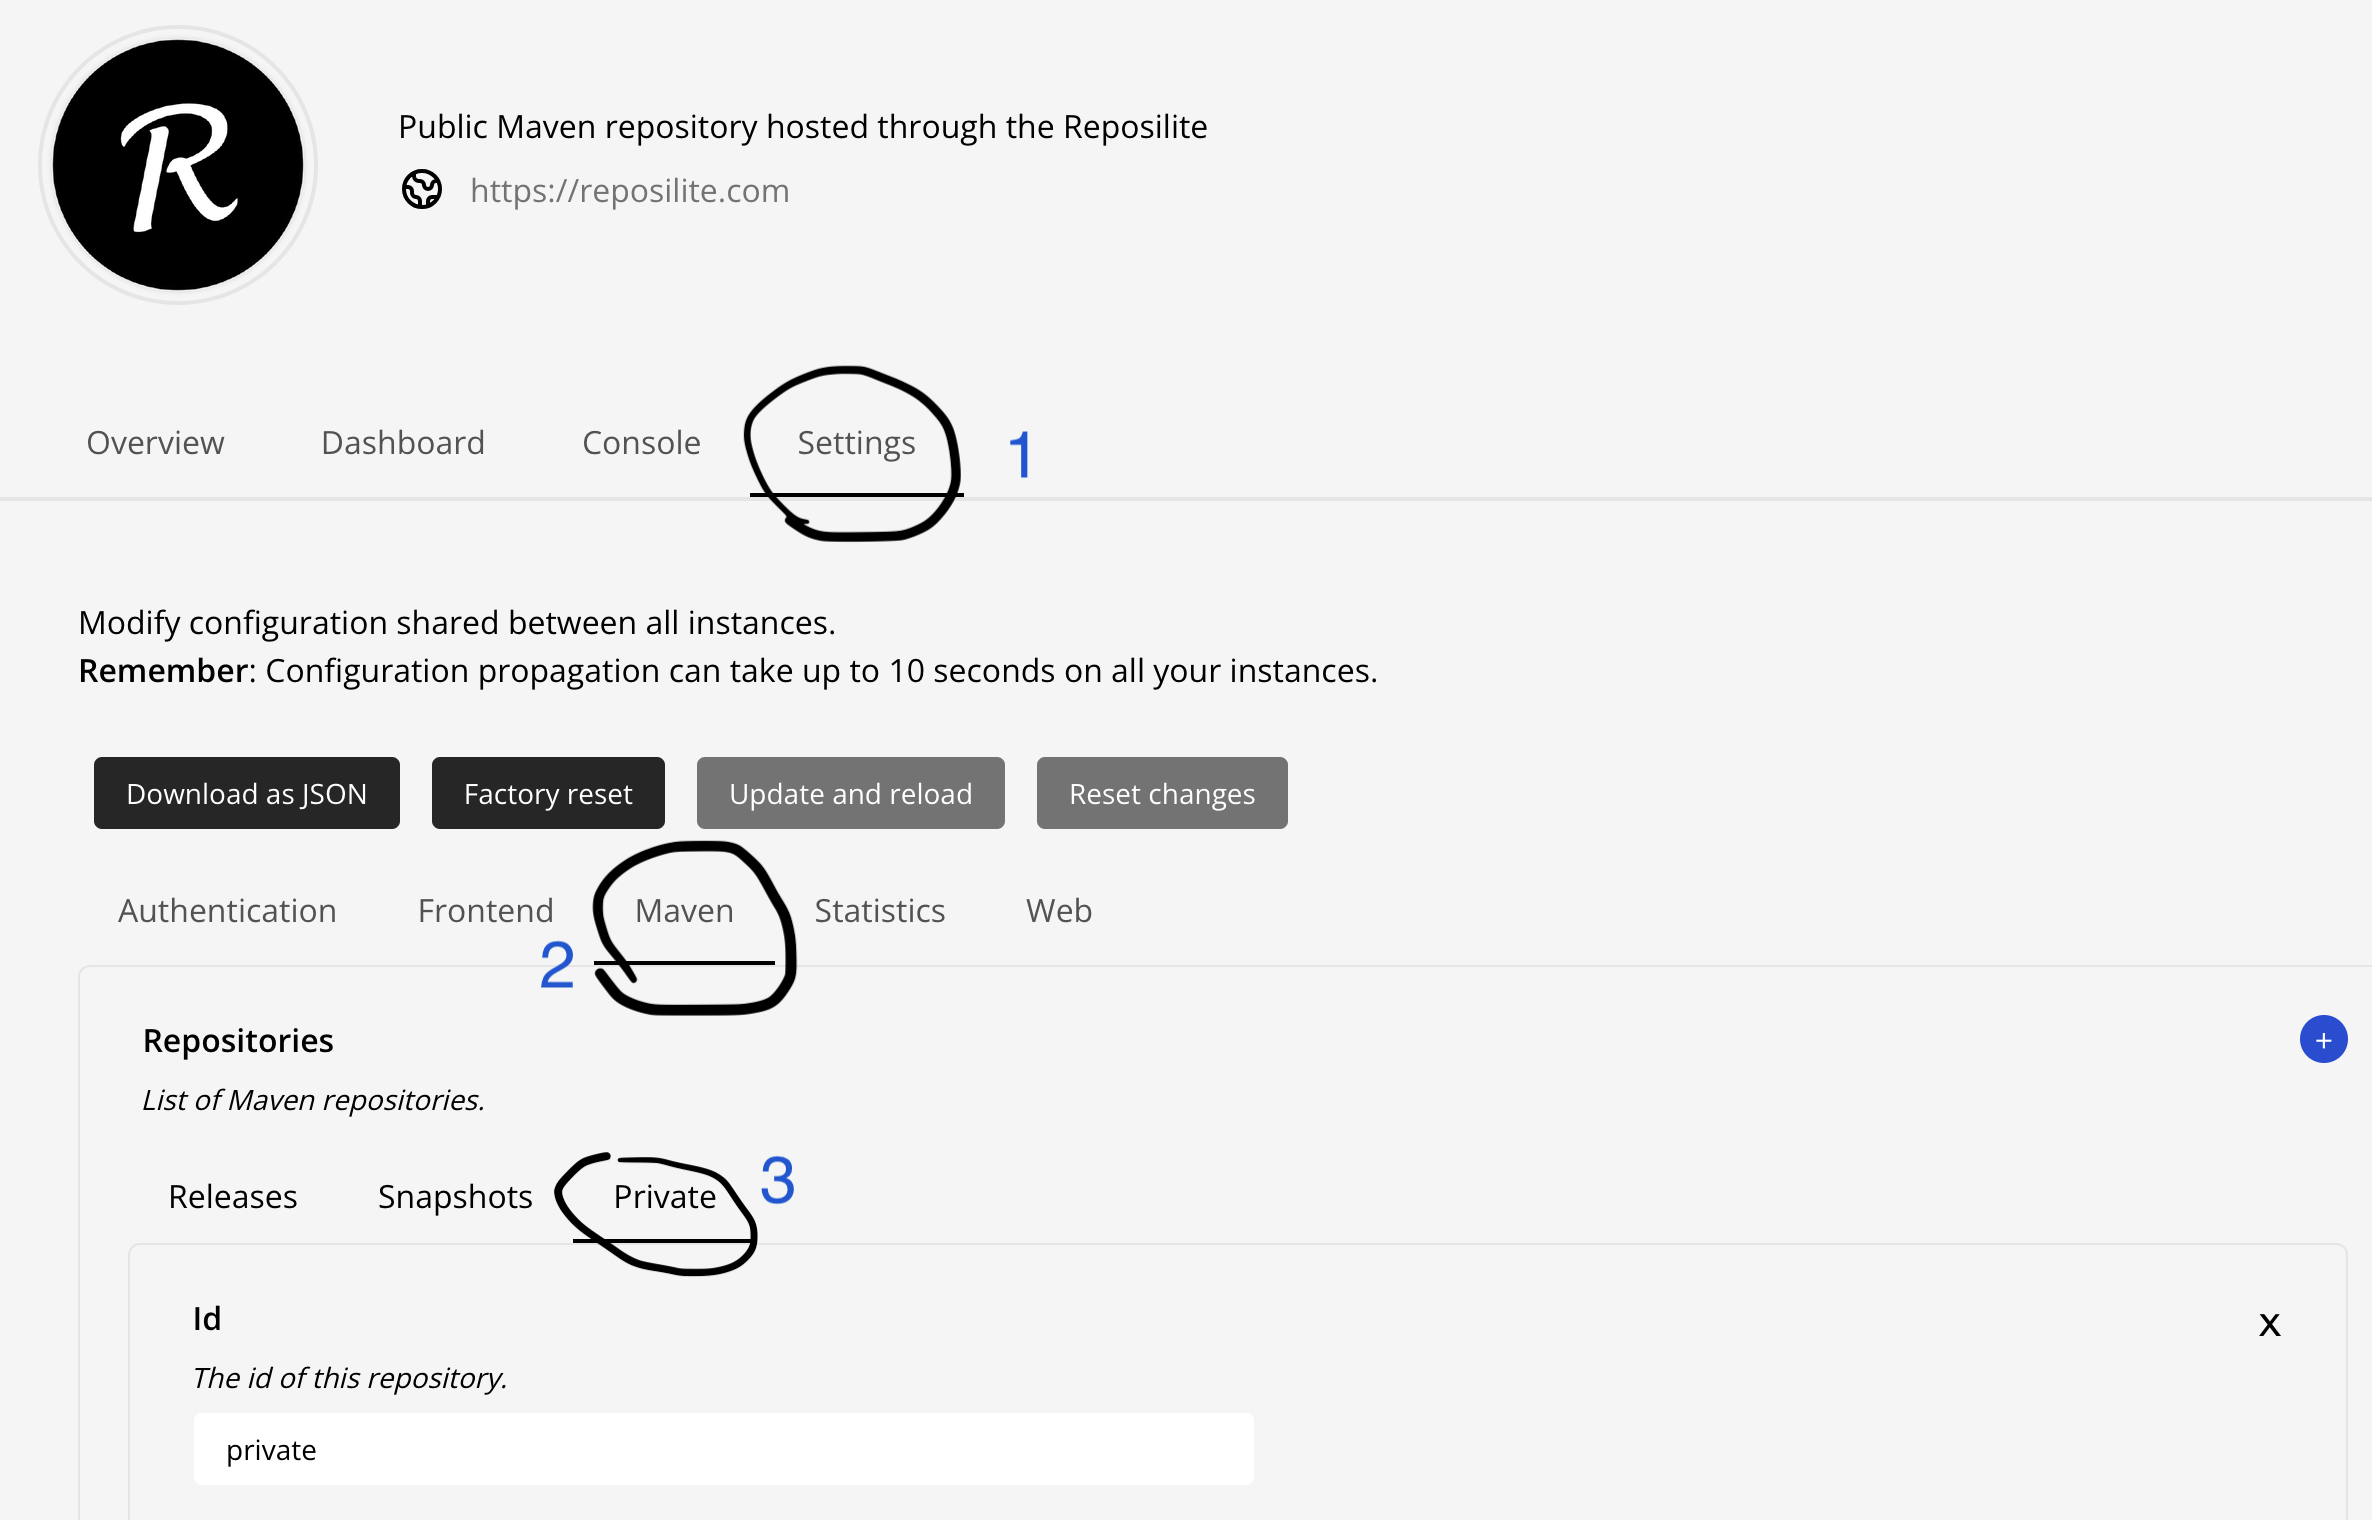
Move to the bottom of the page to add a new mirror by clicking on the + button. The Reposilite documentation details of the available options when creating mirrors: https://reposilite.com/guide/mirrors. Let’s add a mirror to the JobRunr Pro private repository.
Fill the form that appears after clicking the + button. You need to provide the JobRunr Pro private releases URL, i.e., https://repo.jobrunr.io/private-releases/ and fill the username and password fields with the credentials we’ve shared with you. Select Basic as authentication method and make sure to enable Store to cache the artifacts.
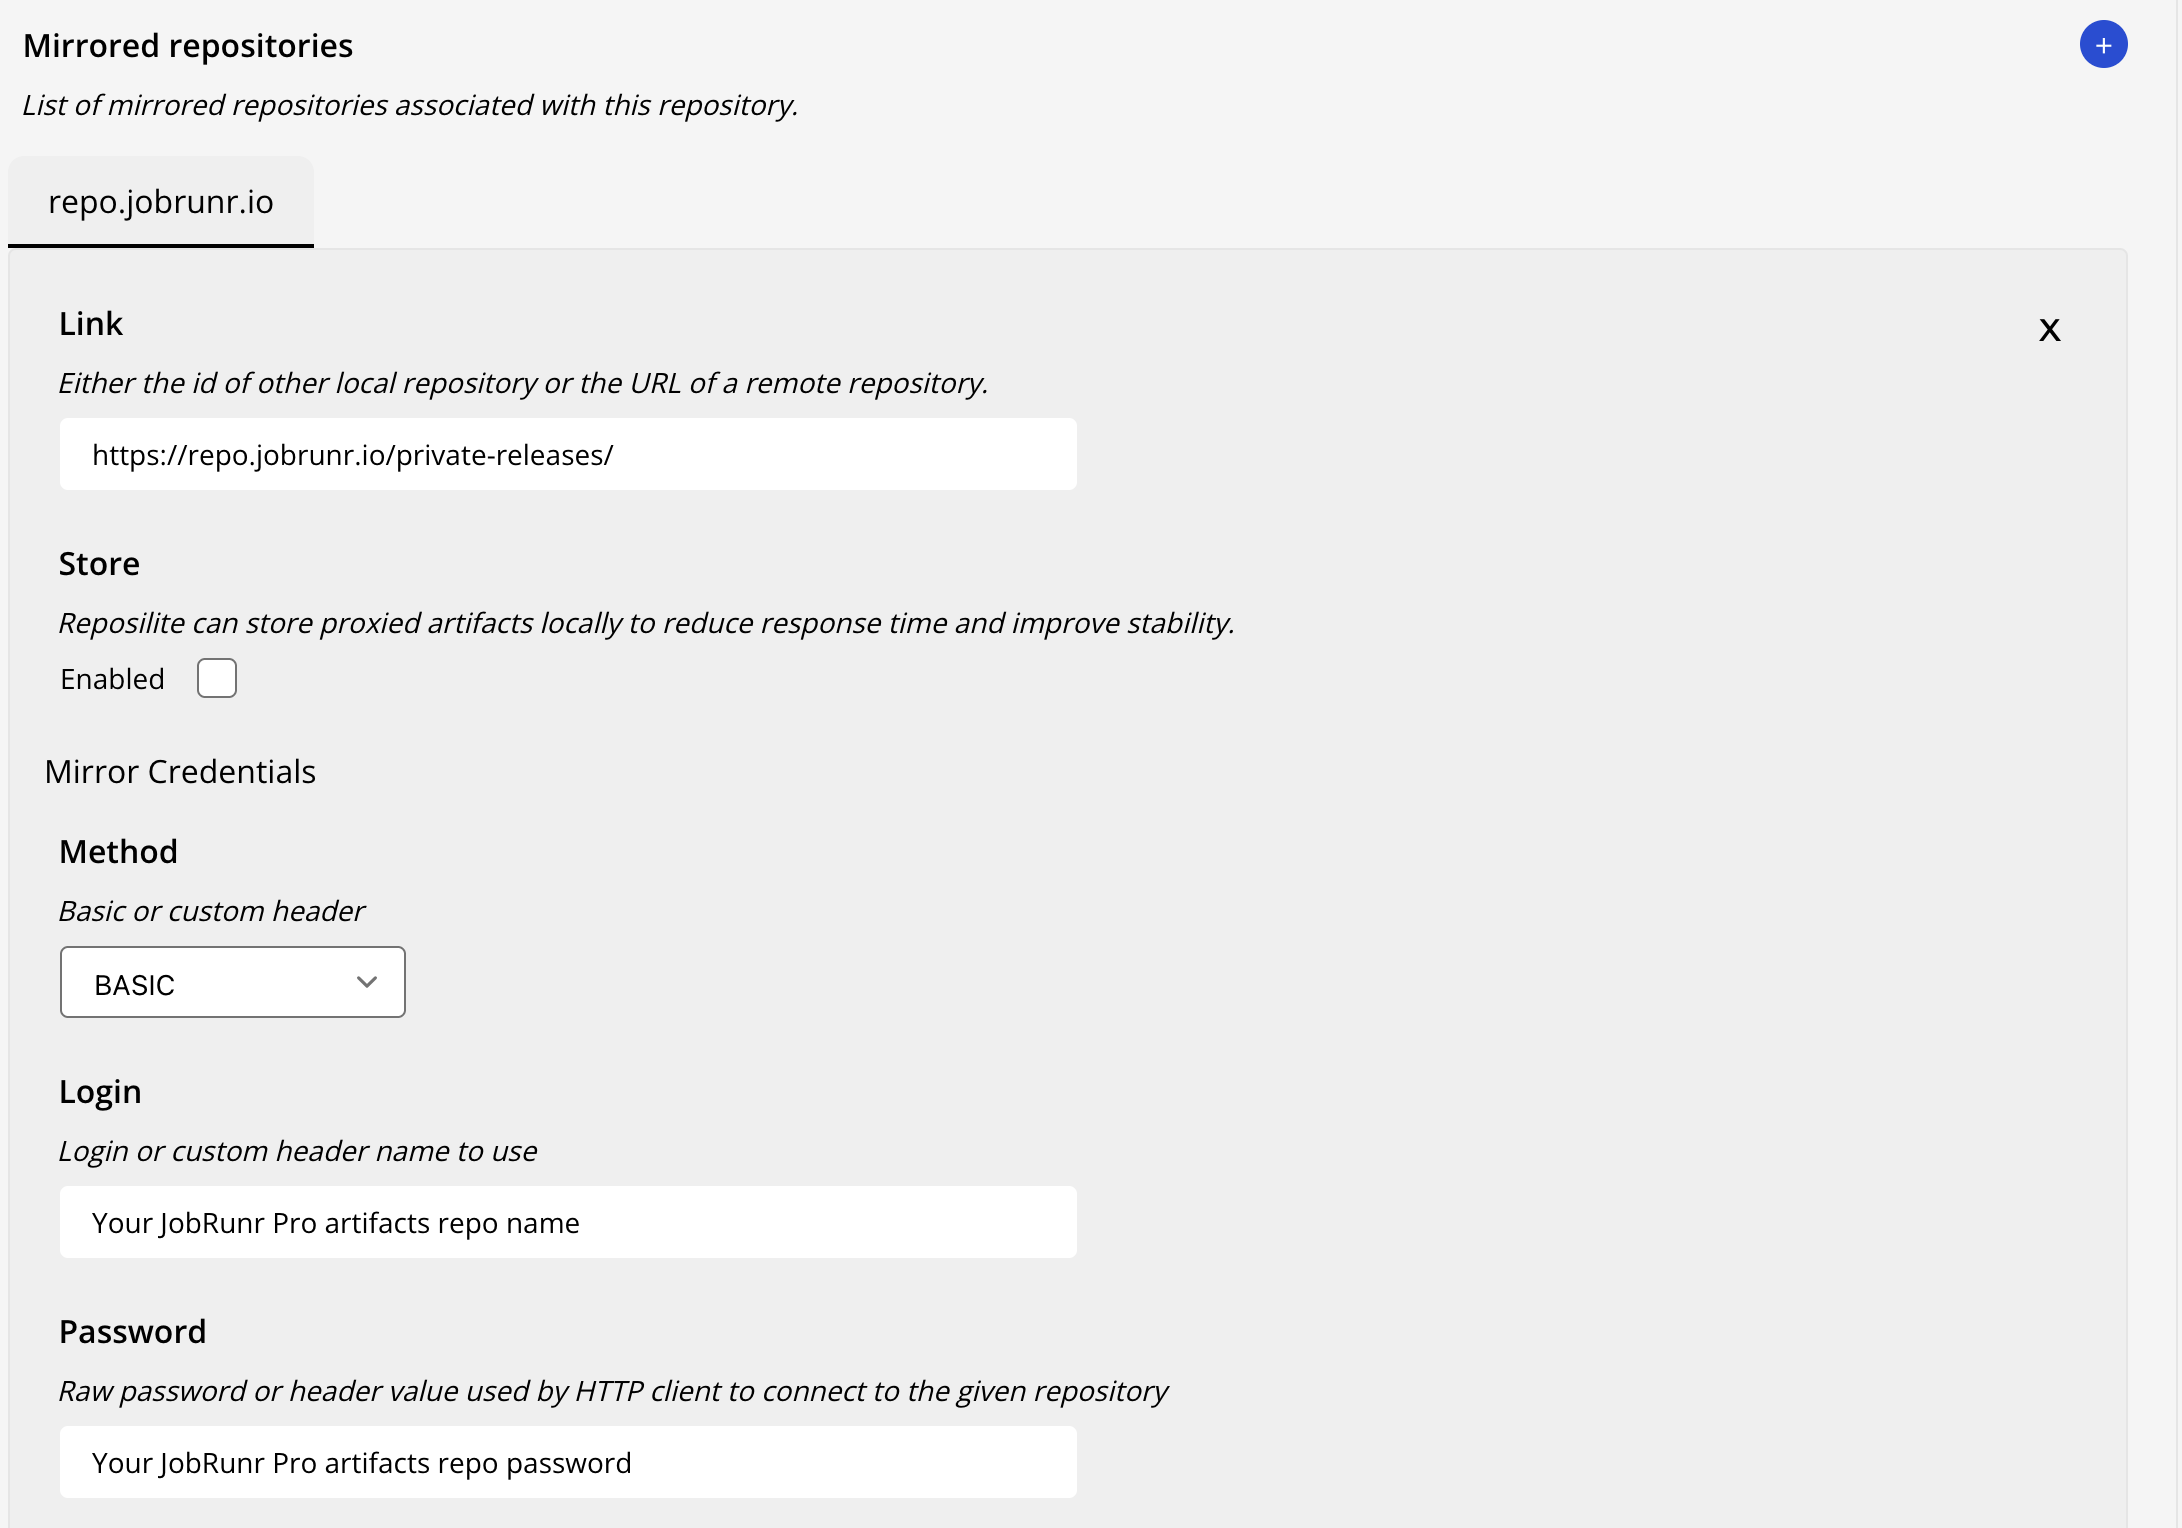
That’s it! By following these steps, you have successfully configured the minimum required configuration for Reposilite to proxy the private releases.
Update your build tool configuration
You can find the summary of the information needed for your build tool to connect to the proxy, i.e., the name of the repository and its url by going back to the Overview page and clicking on the private repository.
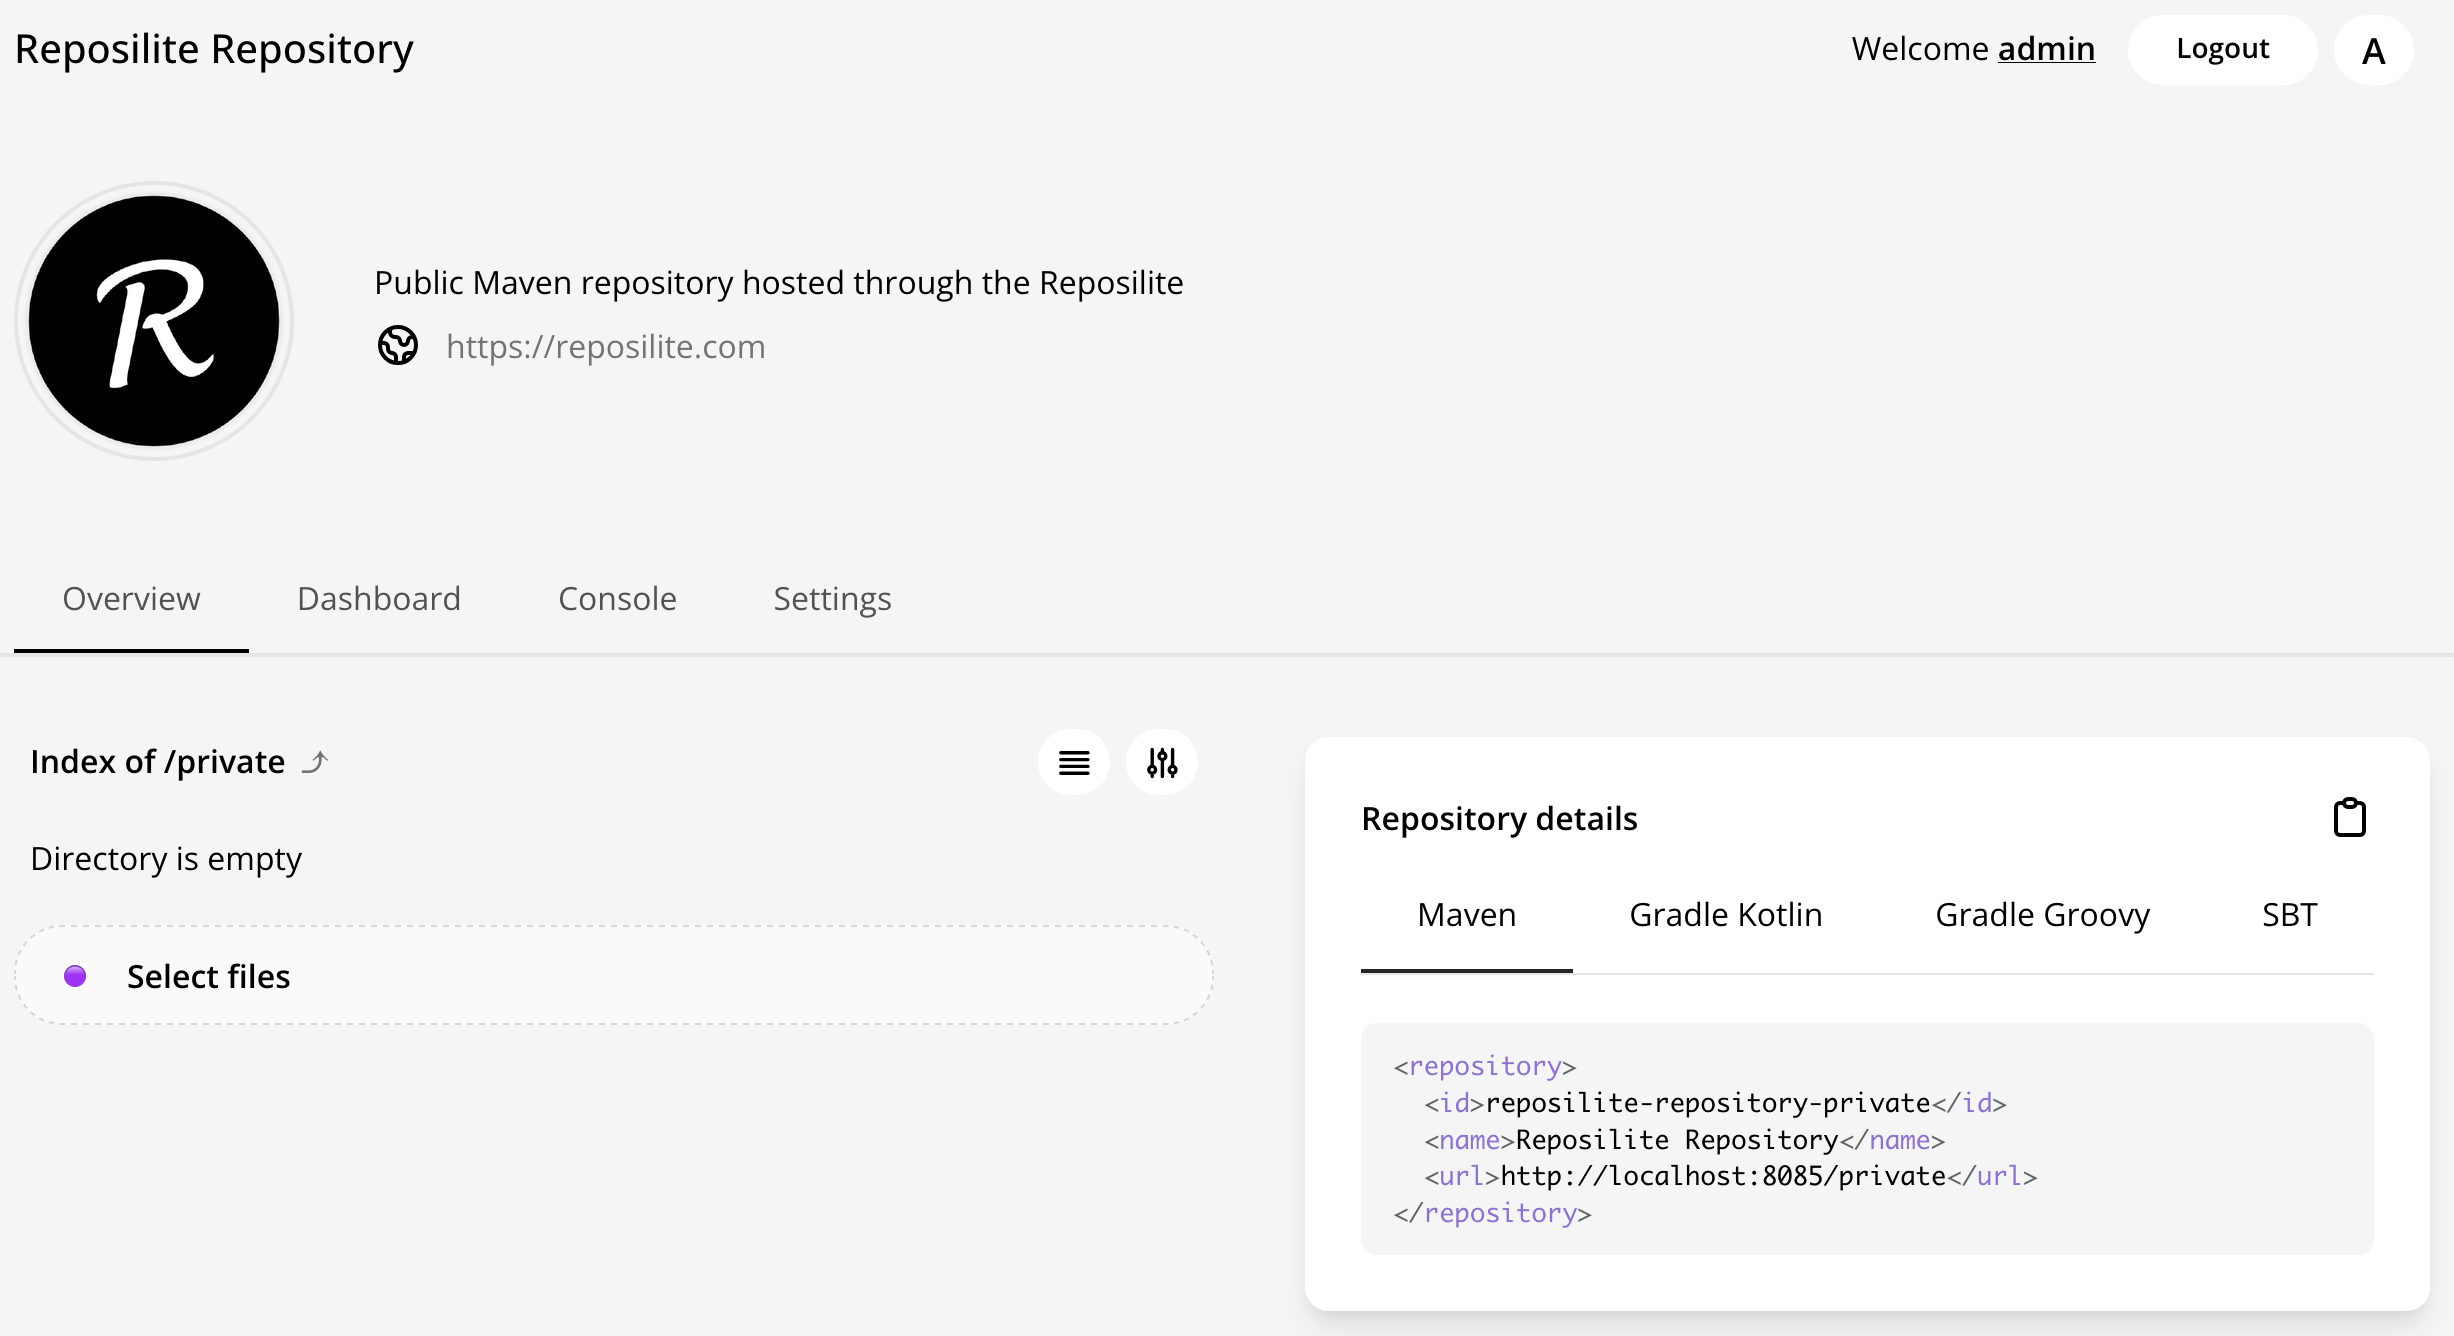
Using this information, you can proceed and configure your build tool as you’d usually do.
In our tests, we use the credentials of the admin, please make sure the user you usually use has access to this newly added repository proxy.
Sonatype Nexus
Starting a local Sonatype Nexus Repository server
To start a local Sonatype Nexus Repository server, we’ll be using the official Docker image that you can find at https://hub.docker.com/r/sonatype/nexus3/.
Start the container as follows:
docker run -d -p 8081:8081 --name nexus sonatype/nexus3
This starts a server exposed on port 8081.
Setup the JobRunr Pro private releases proxy
Once Docker is running the Sonatype container, let’s head over to http://localhost:8081 to dive into Sonatype Nexus itself.
Nexus creates a default user for us: admin. We’ll need to login with this user if we want to make changes and create our proxy. But first we need to know the password:
docker exec -it nexus cat /nexus-data/admin.password
Running this will output the password to use.
Once we’re logged in, with our fresh installation, we need to complete a few steps, e.g., changing the password.
Where is the login button? Well, yes, the login button is the
exit-like icon at the top right…
Then we can execute the following steps to setup the proxy.
- Configure the proxy
In the sidebar, on the Settings icon, then, expand the Repositories dropdown and select Repositories. At the top of the page click on Create repository.
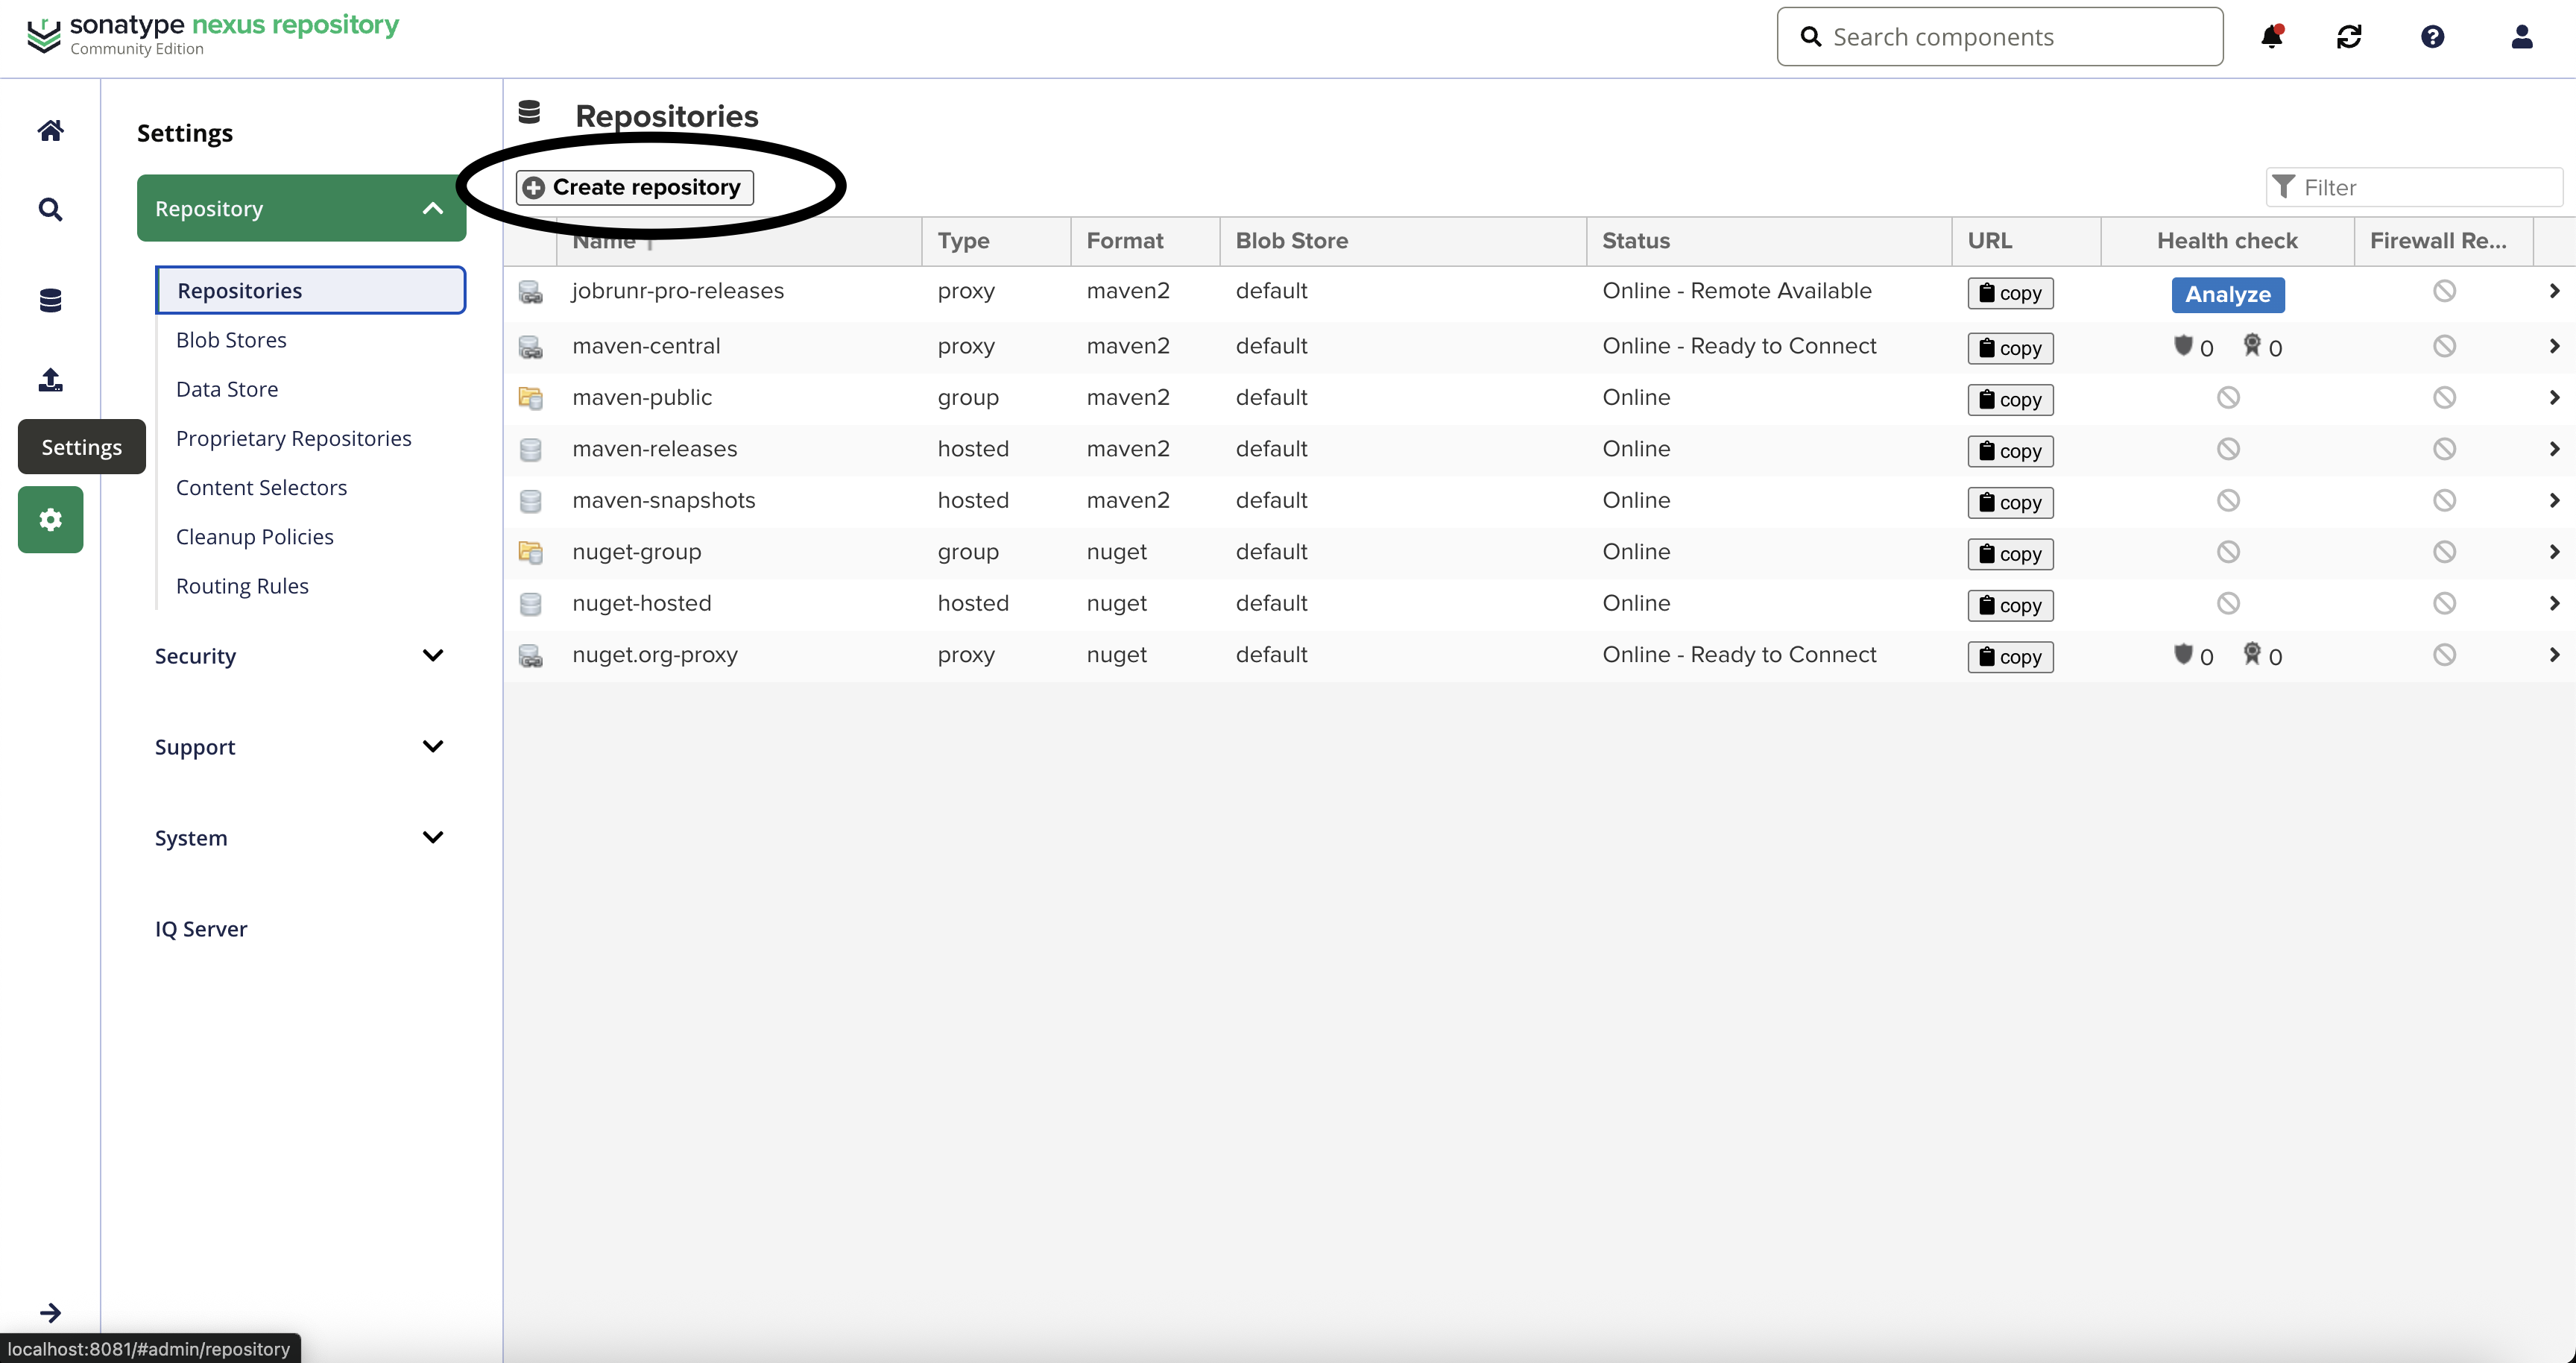
This will initiate the creation of our the proxy repository. After the click, we’re prompted to choose a Recipe, scroll down until you find maven2 (proxy). Select it.
From there, for our demonstration purposes, we’ll only fill in the mandatory fields and enable authentication:
- The
Namefield, you’re free to enter a name to your liking - The
Remote Storagefield, enter the URL to JobRunr Pro private releases - Scroll down to the
Httpsection and check theAuthenticationcheckbox - Fill the username and password fields with the credentials we’ve shared with you
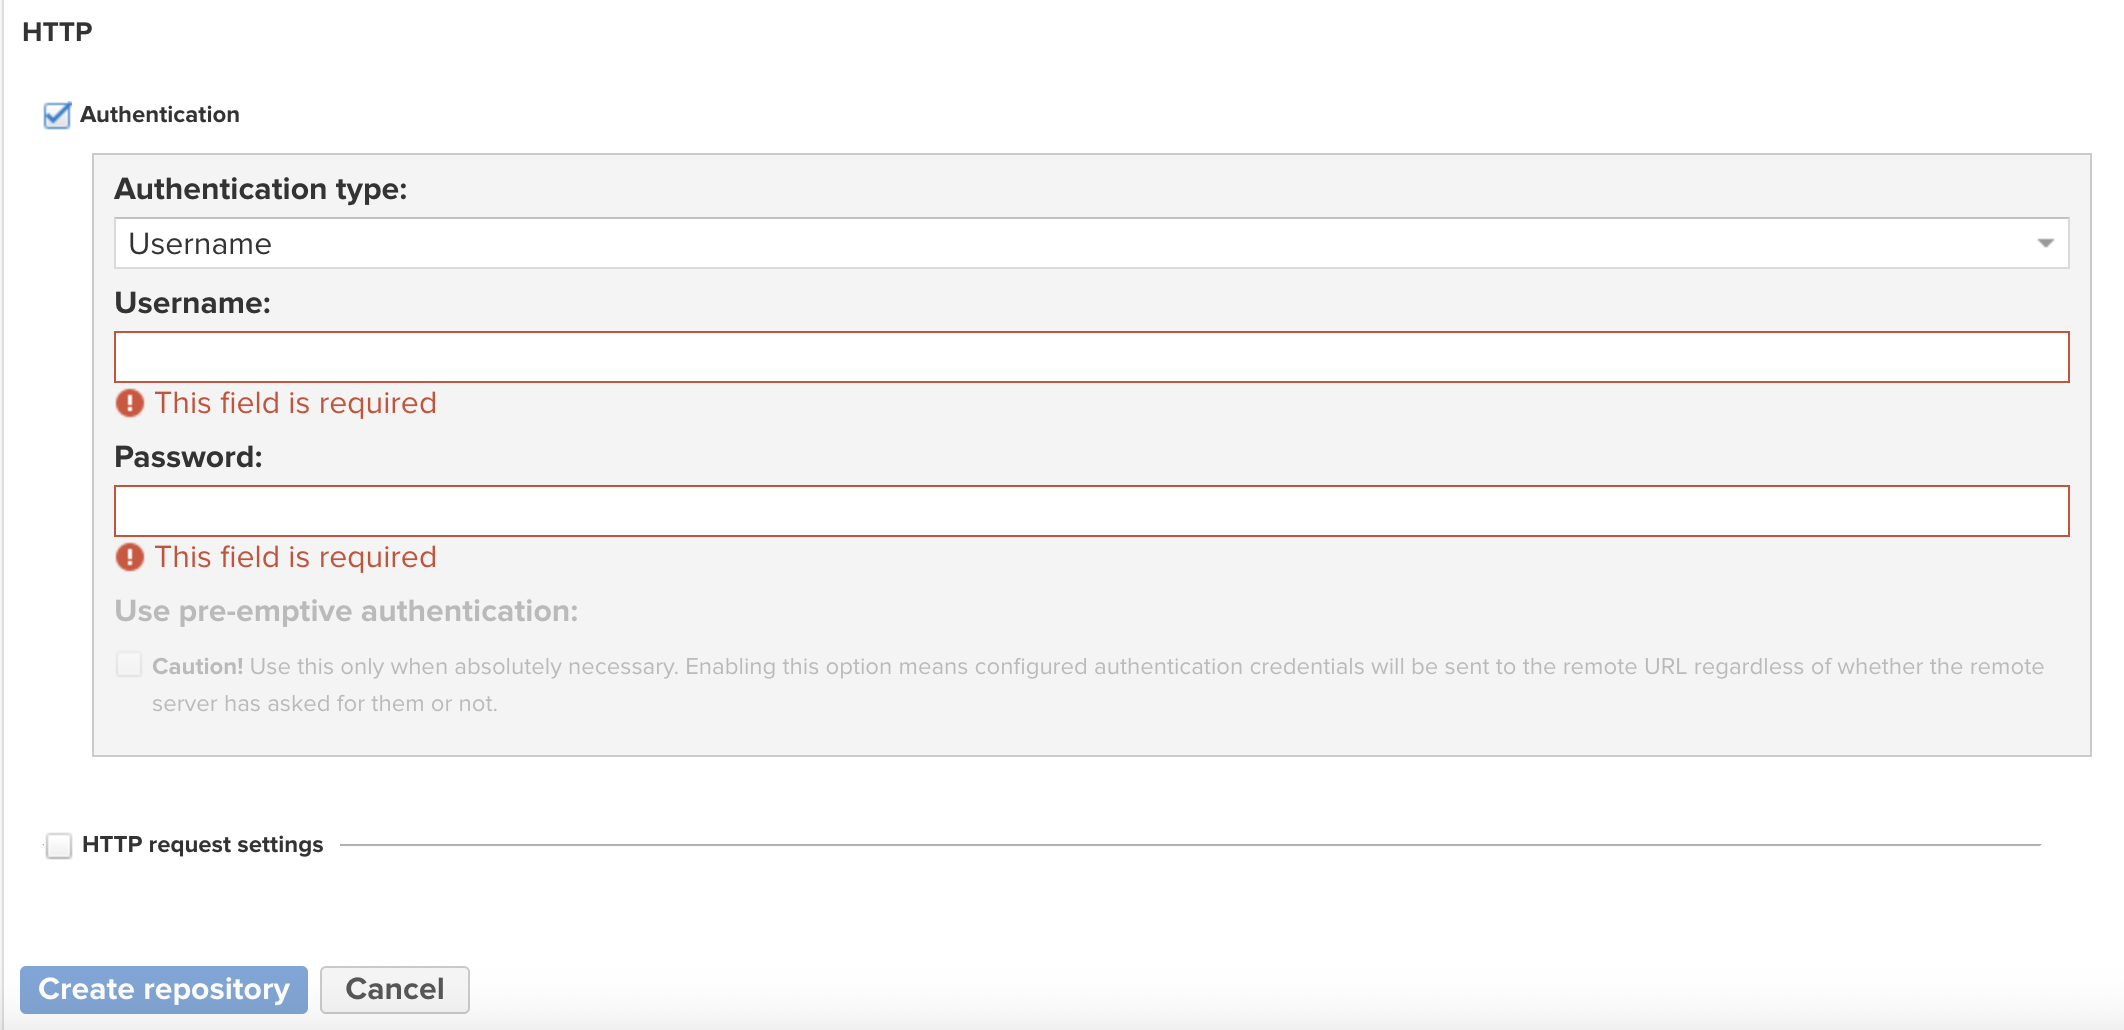
That’s it! By following these steps, you have successfully configured the minimum required configuration for Sonatype Nexus Repository to proxy the private releases.
Additionally we also made sure
Anonymous Accessis disabled. This can be done by going toSettings > Security > Anonymous Access.
Update your build tool configuration
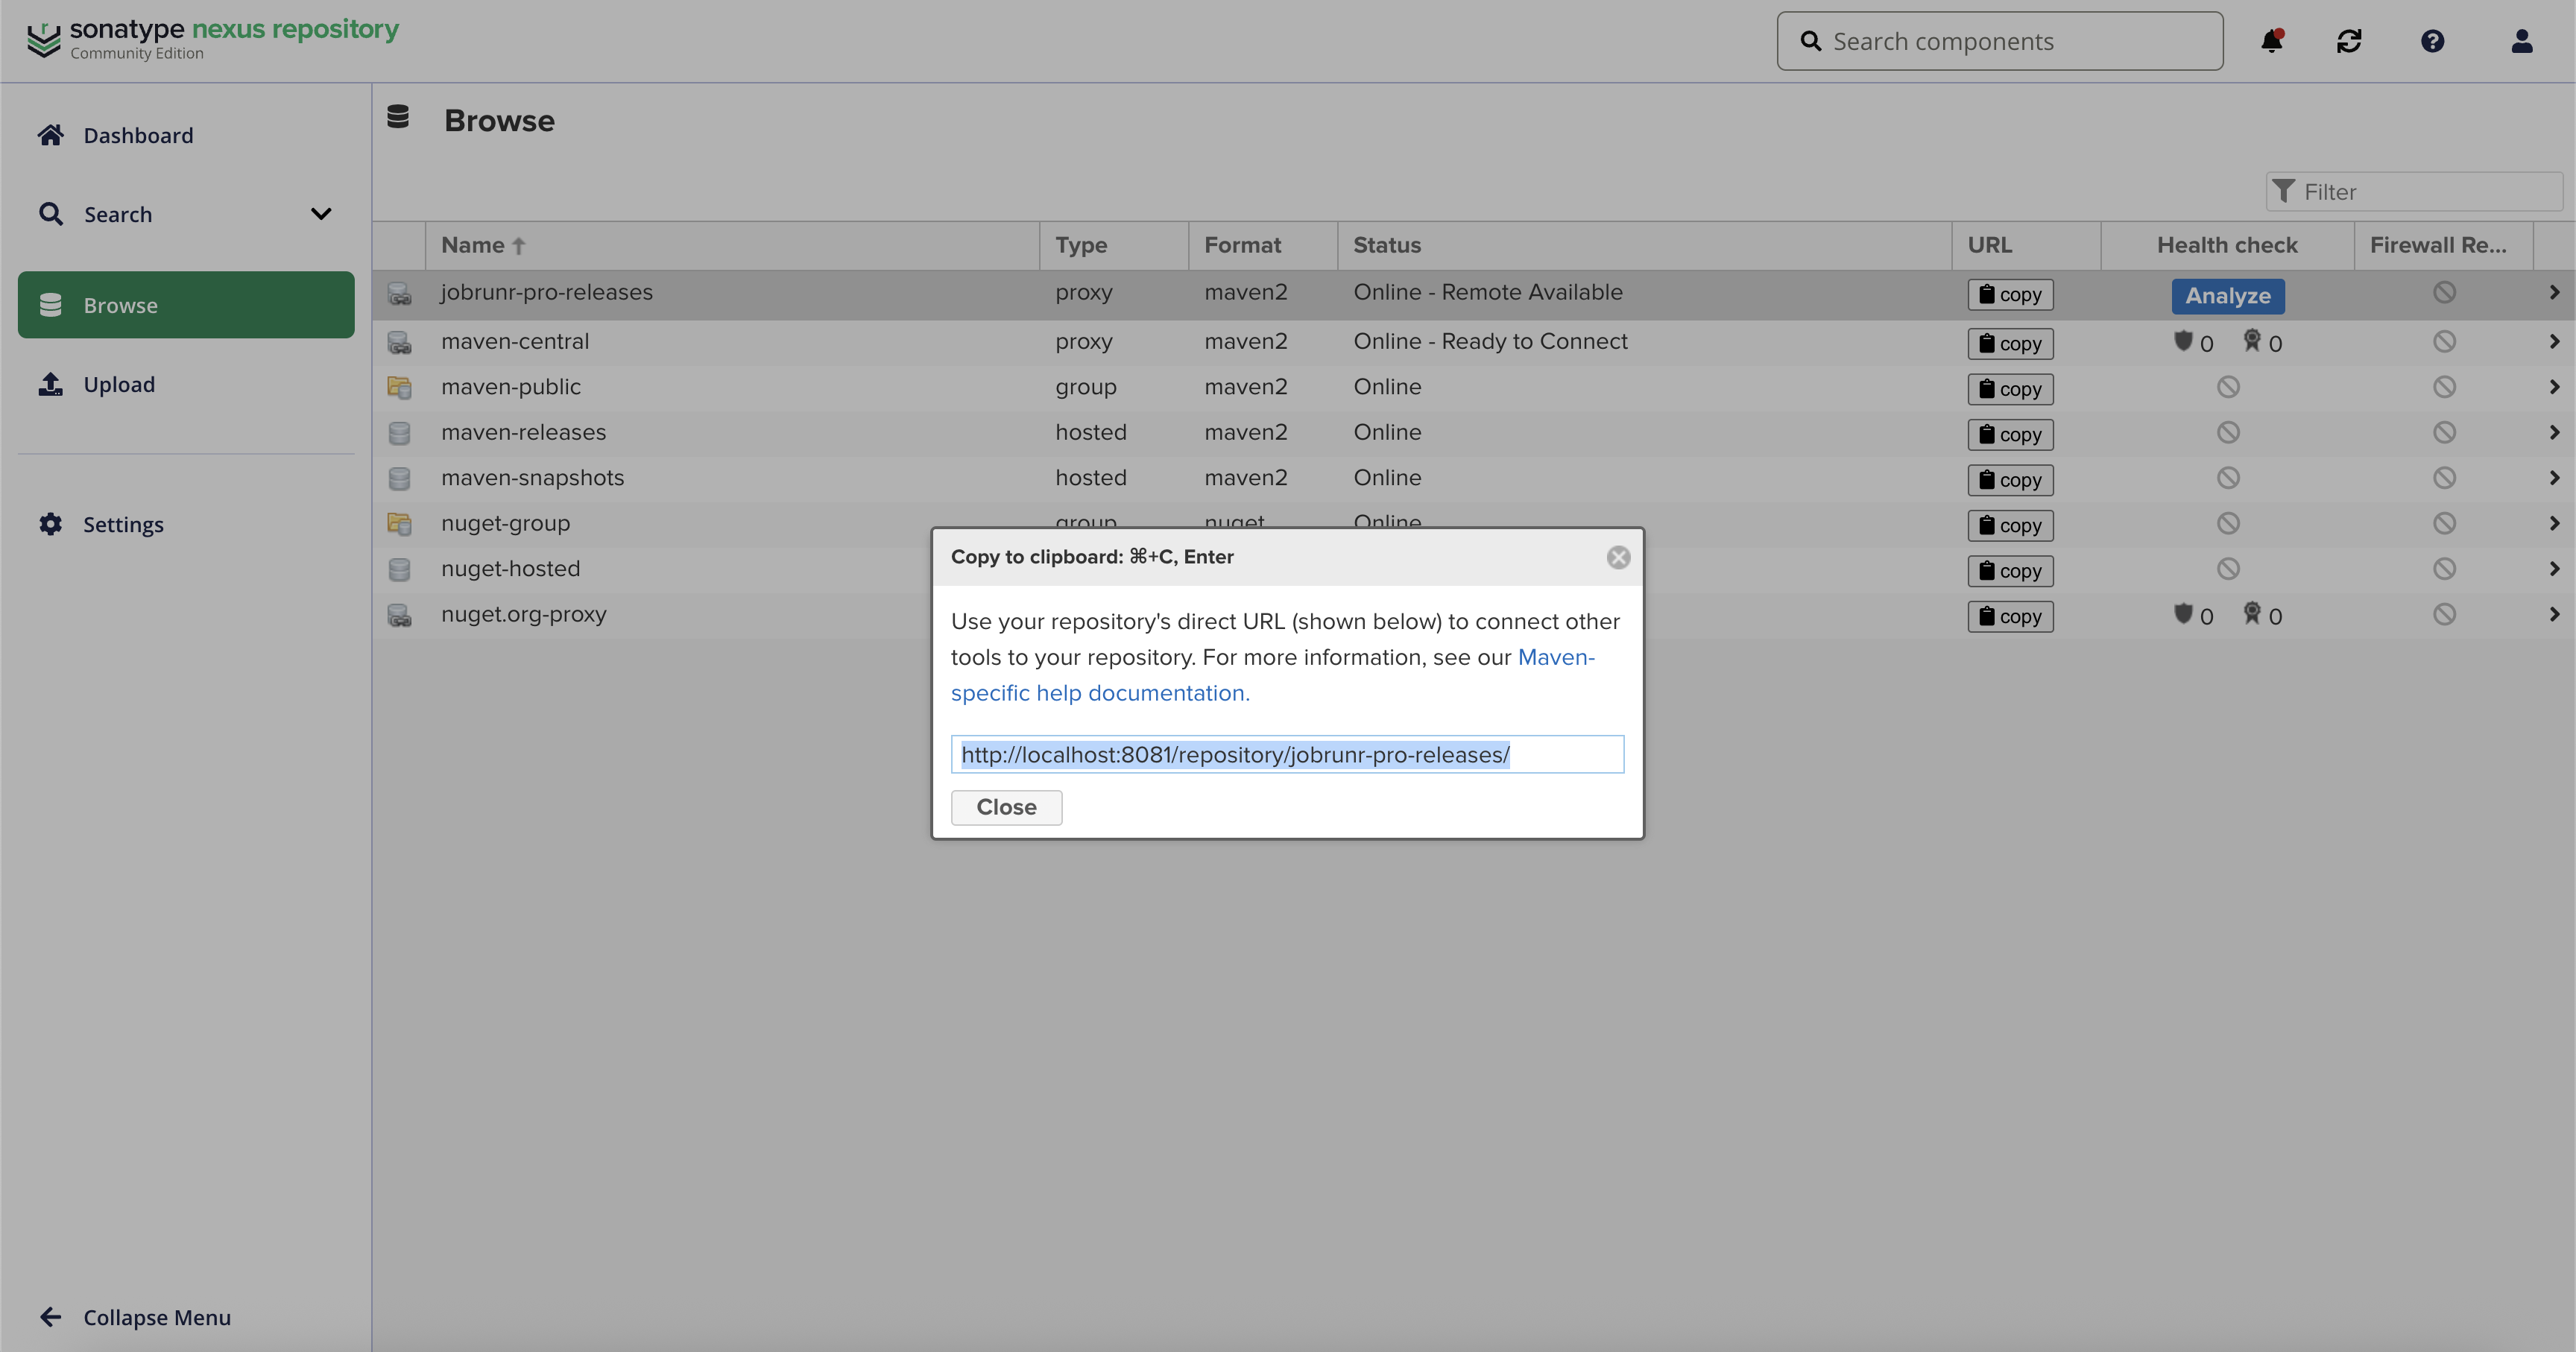
You can find the summary of the information needed for your build tool to connect to the proxy, i.e., the name of the repository and its url by going to the Browse page. The URL can be copied by clicking on the copy button in the URL column.
Using this information, you can proceed and configure your build tool as you’d usually do.
In our tests, we use the credentials of the admin, please make sure the user you usually use has access to this newly added repository proxy.

